 I have a little black RTW top with shelf bra that is completely worn out, so I modified this TNT pattern to make a new one.
I really like the adjustable straps on the old top and cannabalized the rings to reuse in my new top.
I also like the back of the old top. It isn’t cut straight across like this pattern is, but rather mirrors the front. I tended to wear it under other tops like a camisole. Too bad I wore it out.
 I put together this tip for anyone who doesn’t have a RTW top hanging around to look at. It is simple to do and comfortable.
Click each picture for a larger view.
Materials needed:
1/4″ bra strap elastic (plush) or 1/2″ fold over elastic
(4) 3/8″ Strap Rings
(2) 3/8″ Strap Slides
1) cut (2) shoulder straps 11-12 inches (mine are 11 3/4″)
2) After applying elastic around the armhole, leave extra elastic to attach rings to the top. These raw elastic extensions on front and back of top are about 1 1/4″ long.

3) Attach plastic ring to each raw elastic strap extension on front and back of top and tack down with straight stitch

4) Sew one slider ring at one end of each shoulder strap

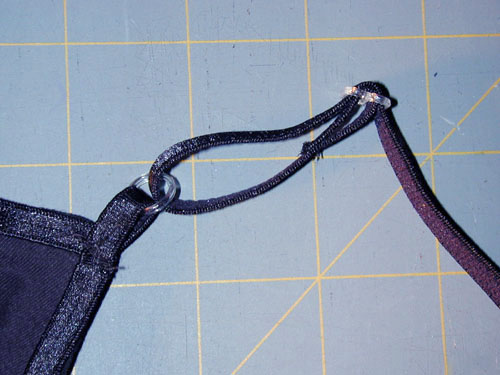
5) Feed strap up through front ring with strap wrong side up, top right side up and pull strap through lower slider

6) Pull strap through upper slider

7) This is how it should look

8) Slip strap through back plastic ring and secure with straight stitch, try on and adjust to fit

I used cotton lycra, no longer available from Seattle Fabrics for the shell and 11oz rayon/lycra jersey for the shelf bra from EOS
Probably the only problem with this top is the elastic application.
I ignored the pattern instructions and sewed the shell and shelf bra wrong sides together and then turned to the right side. It was a bit bulky after applying the elastic on top, so I’ll go back to following the pattern instructions next time.
 I cut the front and back from the front piece on the fold. This is how the back looks!
Next time I will remove 1/2″ from the center back before cutting on the fold. I really like this back better than the pattern drafted back piece but it is a tad too wide.
I also added 2″ below the waist so I can tuck it in.
Michelle
Those are great instructions! I so prefer adjustable straps for camis. Did you use foldover elastic or not and how did you sew it on? Did you use a special attachment?
Leah
Hi Michelle! I used 1/4” elastic with the plush backing. Didn’t use any special attachment, just sewed it in a 1 to 1 ratio but will try stretching the elastic slightly next time. I think I was afraid to misalign the elastic since I wasn’t using an attachment 🙂
Linda
Saw your review of top at PR. Your instructions for the straps are great! Glad you referenced your blog.
stacy
I love this idea! I’m going to have to remember this tip. Now, I’m running off to PR to see your review too!
Tany
Great idea! Thanks for sharing this!
Kathi Rank
I followed your PR review to see how to do the adjustable straps. This KS pattern is one of my favorites and I have made at least 20 camis from this pattern for family members. My daughters like shirts that stay down, so their versions of the pattern are 5-6 inches longer than as KS drafted….I really like your use of the front for the back – I’ll do it with my next version. Now off to the internet notions stores to find the rings I need to try the strap treatment. Thanks.
BioHappiness
Nice instructions. I would like to make these some time. Where can I find the elastic straps and rings? Should I look close at my local store or get it online? Thanks 🙂
Leah
Hi Pinkhibiscus! Checkout your local store to see what they have. Joann has some package sets, at least mine does. One good online sources is http://www.fabricdepotco.com, or so I hear -I have only made a list so far, haven’t bought from them yet. I’ll let you know if I come across additional sources. Have a great day! 🙂
Zoe
HI Leah,
Thanks so much for directing me to your very useful tutorial. I’d love to link to this tutorial in relationship to my free vest pattern, hope that’s ok. Would you mind if I used an image from this post to illustrate why people should go and visit your tutorial?
All the vest
Zoe
Leah
Hello Zoe,
Absolutely! Link away and you are welcome to the image as well. Thank you so much for asking.
I enjoyed reading your tutorial, I’ll add your blog to my blogroll and your tutorial to my tut section. I can’t wait to try your download!
Leah
Zoe
Hi Leah,
Thanks so much for your quick reply. That’s ace. I’ll probably blog the link next week. Hope you are well, happy Tuesday!
Zoe x
Felicia
Hi, thank you for this great tutorial! I am just wondering if another method could be to sew the ring onto the top itself, rather than having the short section of elastic. I have a dress that has fabric straps instead of elastic, and would like to try adding these rings and sliders to the existing straps. Do you think that would work? Thanks.
Leah
Felicia, I think it depends on the thickness of your fabric straps. The rings are quite small but you can sew the ring to the top itself. Let me know how it works out!
Felicia
Thanks Leah, I will experiment and see how it goes!